That title says it all, this is the 3rd soap I've made since I joined the soap challenge club, and I was determined and focused on the goal of getting my swirl technique as close to perfect as I could. This time when I attempted it, I wanted my soap to show that I was learning. So I kept it simple, ok sorta simple, minor tweaks only. You know I can't ever make things easy for myself.
The challenge this time, was the tiger swirl technique. I really liked it, and it looked so simple from the demonstration, and as we all know simple is my new middle name! I didn't even want to stray too far away from the recommended slow moving recipe that Amy had suggested, that's how simple I wanted to keep it. Of course, that meant I just had to change something about it. Amy's recipe was listed as:
I make no claims about health benefits or anything medical, I just know it's a great tasting cooking fat that can tolerate relatively high heat. So I tweaked Amy's recipe by subbing out beef tallow with ghee, I didn't even change the percentages. Other than that I followed her recipe to the letter. To keep the batter fluid, I also added 1 tsp. of sugar per pound of soap, since I was only making 2lbs. of soap, I obviously added 2tsp. of sugar. Then I got worried that it would take too long to set up, because it was a slow moving batter and then I added a de-celerant to it. So I thought to myself, I'll add salt, but not the same amount as the sugar, because I thought that it would basically neutralize what I was trying to do. I'm not sure if that's actually true, but I didn't want to test it out. So, only 1tsp. of salt was added to the batch.
The colours were the same as well, with the holidays upon us, I had no extra funds to spend. So, I used what I had on hand Moroccan red clay, Activated charcoal, and Paprika. I knew from the cosmic swirl soap that a mixture of red clay and paprika would give me the orange colour I was looking for. I decided to be very literal about this particular swirl So I mixed up my tbsp. of oil with 1 tsp. of colour and added it to my soap, of course it was not enough and I had to add to 'taste'. It ended up being more like 2.5 tsp of charcoal to get the right black, 3.5tsp. red clay and 2.5 tsp. paprika for the orange.

If you're checking out those colours you would guess that I went VERY literal for this swirl. I mean, tiger stripe swirl obviously means 'make it look like real tiger stripes'. That's the naturalist in me coming out, can't deviate from the correct colours that nature prescribed. Ok, I know that sounds weird, but I was trying to keep it simple and the idea of using super bright colours just didn't feel right to me, also I didn't have any super bright colours on hand to tempt me.


the next one, that I did some experimenting with, looked like what I thought it should look like, with the white right under the orange. My stripes for both are amazing, at least to me.
While, I didn't add any fragrance (I'm still not sure about adding smell goods, because I'm never sure how people will like it, and then might get stuck with stinky soap), it still had a unique scent. I thought the ghee scent was very prevalent, non one else noticed that, but they did say that it smelled good. It was also a but crumbly on the edges, I personally think that was due to not gelling it. If I use this recipe again (almost positive I will), I'll definitely gel it, come to think of it, these colours are really bright for not going through gel
The challenge this time, was the tiger swirl technique. I really liked it, and it looked so simple from the demonstration, and as we all know simple is my new middle name! I didn't even want to stray too far away from the recommended slow moving recipe that Amy had suggested, that's how simple I wanted to keep it. Of course, that meant I just had to change something about it. Amy's recipe was listed as:
⠂33% beef tallow ⠂33% olive oil ⠂30% coconut oil
⠂4% castor oil ⠂6% super fat ⠂with a 30% lye concentration
the down side...I don't have beef tallow or know where to get any at a reasonable price in my area. Now I had to find an alternative, that was very similar, available immediately and affordable. Nothing too hard at all, right? Luckily, a few months ago I had the bright idea to print out the oils list from Soapcalc.net (sometimes I'm a very intelligent woman, lol). While perusing the list I realised that Ghee was as close as I was going to get, and guess what?! I already had it in the house...
I actually use this to cook with, and if you haven't used it to pop your own popcorn, fry up an egg or make grilled cheese sandwiches, you're missing out, for real. If you don't know what Ghee is, it is...
''...a type of clarified butter that is not only used in the dishes, but also in medicines and traditional religious rituals in many parts of Southeast Asia.
"Ghee" comes from the Sanskrit word meaning "sprinkled," and it basically means that the milk fat is rendered from the butter to separate the milk solids and water. It’s made by melting butter and skimming the fat off of the top. You’ll be left with a yellow liquid when it’s hot and a creamy looking solid one when the ghee cools down. Not only is this easy to make, ghee also has a number of benefits.'' - Medical Daily


I make no claims about health benefits or anything medical, I just know it's a great tasting cooking fat that can tolerate relatively high heat. So I tweaked Amy's recipe by subbing out beef tallow with ghee, I didn't even change the percentages. Other than that I followed her recipe to the letter. To keep the batter fluid, I also added 1 tsp. of sugar per pound of soap, since I was only making 2lbs. of soap, I obviously added 2tsp. of sugar. Then I got worried that it would take too long to set up, because it was a slow moving batter and then I added a de-celerant to it. So I thought to myself, I'll add salt, but not the same amount as the sugar, because I thought that it would basically neutralize what I was trying to do. I'm not sure if that's actually true, but I didn't want to test it out. So, only 1tsp. of salt was added to the batch.
The colours were the same as well, with the holidays upon us, I had no extra funds to spend. So, I used what I had on hand Moroccan red clay, Activated charcoal, and Paprika. I knew from the cosmic swirl soap that a mixture of red clay and paprika would give me the orange colour I was looking for. I decided to be very literal about this particular swirl So I mixed up my tbsp. of oil with 1 tsp. of colour and added it to my soap, of course it was not enough and I had to add to 'taste'. It ended up being more like 2.5 tsp of charcoal to get the right black, 3.5tsp. red clay and 2.5 tsp. paprika for the orange.

If you're checking out those colours you would guess that I went VERY literal for this swirl. I mean, tiger stripe swirl obviously means 'make it look like real tiger stripes'. That's the naturalist in me coming out, can't deviate from the correct colours that nature prescribed. Ok, I know that sounds weird, but I was trying to keep it simple and the idea of using super bright colours just didn't feel right to me, also I didn't have any super bright colours on hand to tempt me.
This was my inspiration, you don't even understand how happy I was to know that not only, did I have the right colours for this, but since Asia is where tigers are and I was using ghee and coconut oil, which are widely used there, it was serendipity (hey, this is my logic, just go with it). My mom and sister straight up called me a nerd because of this, I didn't care.
Hopefully, you watched that youtube video linked above and saw how this was done, so I don't have to go into detail, but basically, you pour your soap out of a narrow spout container in as straight a line as possible and then alternate your colours directly on top of each other in straight lines. I started with black and white stripes to mimic the tiger's belly. As you can see, I pour a straight line like sailor walks on land.

then I did the transition to orange, and quickly realized that this was going to take forever.

So, I created my own quick pouring method known as the 'double fisting'. It's just what it seems have a container of colour in each hand and pour back and forth. I tried to get my sister to take a video of me doing it, but she refused (ugh, siblings!). I thought about doing another swirl pattern on top like I saw in all the videos, but after looking at mine, I decided against it. I mean, how much more "tiger-like" can it get. I'm positive this is a once in a lifetime result, wasn't gonna ruin it.

So, I created my own quick pouring method known as the 'double fisting'. It's just what it seems have a container of colour in each hand and pour back and forth. I tried to get my sister to take a video of me doing it, but she refused (ugh, siblings!). I thought about doing another swirl pattern on top like I saw in all the videos, but after looking at mine, I decided against it. I mean, how much more "tiger-like" can it get. I'm positive this is a once in a lifetime result, wasn't gonna ruin it.

I had a good amount of batter left over after pouring this one and thought, "self, why not "be creative" and try another pouring technique to see if you can get the lines to be super straight." That's when the bright idea of putting cardboard on top hit me. I know I saw another soap blogger do it, I think for wood grain technique and I wanted to try it (see...determined to try new things and get better).


It started to get thick towards the end and a bit gloopy, hence the lumpy look at the top. I didn't do CPOP this time (I regret that) and forgot to wrap it to get it to go through gel phase. I was so used to soaping in the summer and having my soap automatically gel (because my A/C is broken and my house is hot) that I forgot that my mother keeps her house in the mid-high 60's this time of year. So when I left out overnight, I don't know what I was thinking.
It was ready to un-mould the next day, but I wanted to be sure it had set right, since it was a slow moving batch, so I took it out on the mould but left it alone for another 48 hours. Then the big day came, it was time to cut! I was soo excited, my family thought I was off my rocker (lol, I always wanted to say that.)
The first one, done the way Kenna of Modern Soapmaking and Amy showed, looks very much like my inspiration photo.


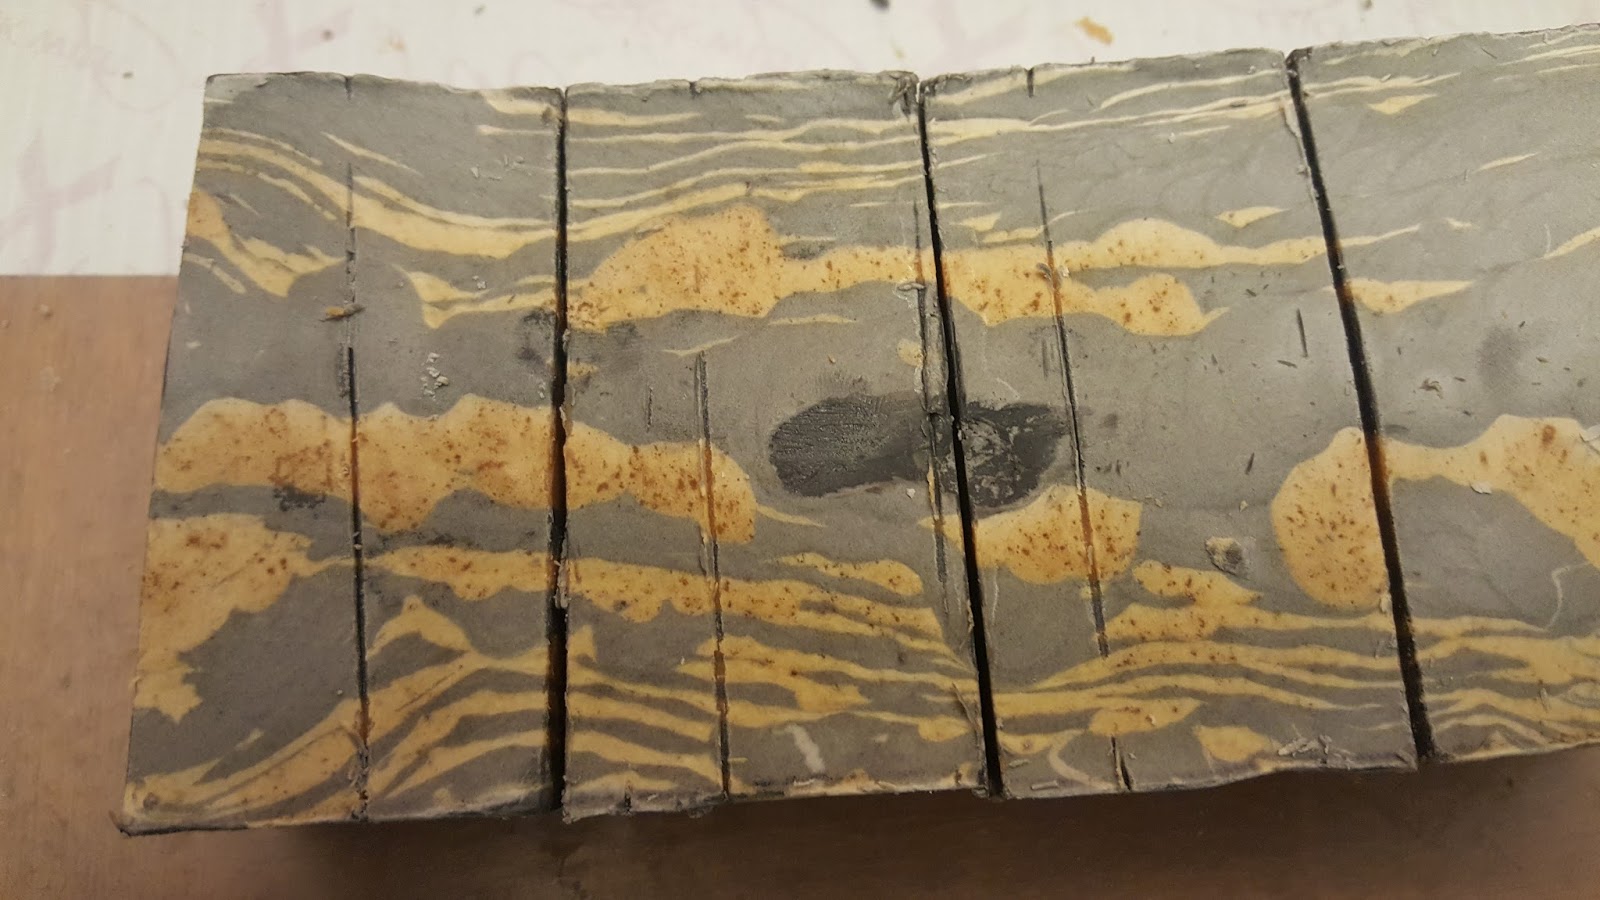  |
My nephew thought it would be cool
to stick his finger in the soft soap.
|


