Pages

Saturday, March 25, 2017

The Enemy From Within...

This month's soap challenge from Amy Warden, really was a challenge. I strongly dislike secret feather, I'm not kidding this swirl can go live where the sun doesn't shine, one of those deep dark turd holes that my dog digs in the backyard. I did it 3 times 3! Do you have any idea how demoralizing that is to me? Yes, yes we all know I like to jump in at the deep end when it comes to things like this, but I didn't even try to do it that way this time. I honestly, just thought, finally, a simple swirl that I can bang out in a few hours and will look pretty. But, Noooo, this had to be the pain in the ass design that made me feel like a damn jackass about my skills. Seriously, I was doubting all my life decisions because of this stupid technique. How could something so simple be sooo hard?  I'm mean I did wood grain, tiger stripes, I even talked someone else through making soap and couldn't do this! Inconceivable! (lol, name that movie). 
 
This is what it should look like. By Handmadeinflorida

It all started with me trying to kill two birds with one stone. My cousin had a baby and I was making a few soaps and scrubs for her since I didn't even know abut the pregnancy till super late and didn't have time to make anything for the baby shower. Long story short, I was planning on making this soap for the challenge and for her. 

I actually, tried 3 different recipes, thinking it was something do with me. 

Recipe 1:


It all started with this jar of ground organic oatmeal sitting in distilled water overnight. I was gonna make oatmeal baby soap, but didn't want the exfoliation factor that whole oatmeal adds to the bar. So I made "oat milk" or at least my version of oat milk. Not sure I'm gonna do that again, it took another 24 hrs for it to filter out properly. I wasn't impressed with the payoff.


but it was just enough for what I needed, just enough. I replaced all the water with the oat milk 


Oat Milk - 38%    Coconut Oil - 35%
Castor Oil - 7%       Olive Oil - 58%

obviously, I figured that with all that Olive oil,  and a superfat of 6.3%, I'd have tons of time to work this soap. I even got fancy for my cousin and infused some olive oil with annatto seed for a little extra color. What was I thinking?


Everything seemed to be going well, as more insurance I soaped at a low 90's temp. I then added ¼c. of goat's milk powder.


I then did some fancy math, with the help of my mom. since we all know that somewhere in high school my math skills went out the door, strange i know. anyway, we figured that to get it right you have to divide the weight of the whole batch into 3 and then divide that number in ½ to get the right amount for the feather part. sorta like this:


   2.06* lbs × 16 = 32.96oz ÷ 3 = 10.98oz. ÷ 2 = 5.49oz.

I then added the infused Olive oil to the large batch along with a fragrance oil blend


 and mixed away


Somewhere around this time it all turned to pudding. Yep, pudding. One minute it was nice and liqud-y the next pudding consistency. But I persevered and kept trying to do the pour with my obviously hand made dividers 


did my alternating pour in the center, but it was more like plopping with some sort of grace and style.  It took almost 3 days to harden enough to even attempt to cut, thanks to all that olive oil and the superfat.


I wasn't sure whether to call it invisible grease stain or ghost in the shell.


Second try went much the same way. I thought hey, maybe it was the new recipe. So I went back to one I knew, KNEW was slow moving. I had used it for the tiger stripes challenge


Ghee - 33%         Olive Oil - 33%
Coconut Oil - 30%  Castor Oil - 4%

With a 30% lye discount and a superfat of 6%, I also decided that I wanted a darker color from the annatto, and by I, I really mean my mother. So I tried again and soaped at an even lower temperature (low 80's this time) added salt to harden and sugar to keep it fluid and changed the fragrance to a blend of patchouli, lavender and orange essential oils. I figured that maybe that was the reason it had gone all pudding-y on me the first time. But this time it wouldn't happen because I had a tested recipe, right? Wrong!

I set up my dividers again and even added rubber bands for more stability


 didn't help, just as I was ready to pour...PUDDING again! I mean COME ON!! this was a tested recipe why would it turn to pudding?! I really just wanted to cry at this point,


but I kept on and finished the swirl...


or so I thought...


I call this one secret bars. how do you miss the whole thing? THE WHOLE THING!!!!  I've never wanted to throw soap before, but I wanted to with this one.

They say 3rd time is the charm, I really, really, really hoped so. I was running low on lye, typical. I tried again. with a new recipe another that I was also sure would give me time to work, but my confidence was shot by this point. 

Castor Oil - 5%      Safflower - 30%
Coconut Oil - 35%     Grapeseed Oil 30% 
Super Fat - 8%

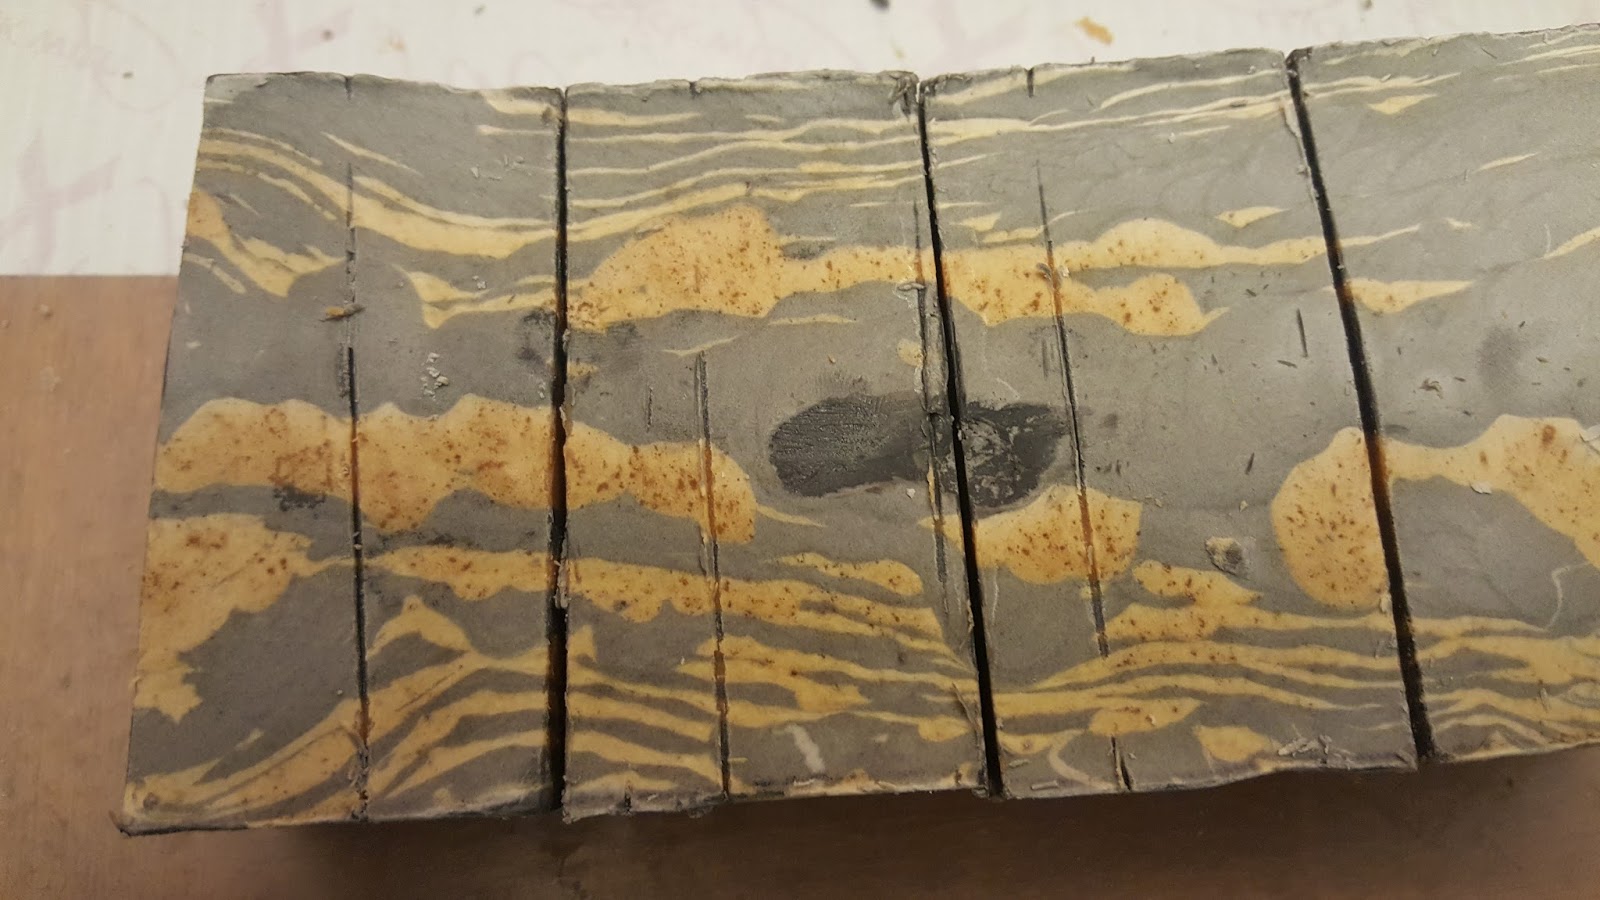
Turned out it worked, it was so fluid that I wasn't sure that there would be any differentiation in colors. I took all the fragrance out and stuck to Moroccan red clay and charcoal for colors, things I KNEW would work. The down side is that this recipe takes days to harden up enough to even think about taking out of the mold. So  I chose to do a CPOP to speed up the process. Warmed up my portable oven and stuck it in there overnight. 


The next morning, I took it out ready to cut. Guess what, it was still soft, of course it would be. So I heated up my oven again and stuck it back in there for a little bit. Bad idea. Thank god it only cost $1.


In the end, I've come to the conclusion that this swirl is just not for me right now, and maybe one day this the far distant future, when I've been soaping for 20yrs instead of 6 months I'll revisit it. I've called is one black coffee and milk.


Ingredients: Coconut Oil, Grapeseed Oil, Safflower Oil (High Oleic), Distilled Waster, Lye, Castor Oil, Activated Charcoal, Moroccan Red Clay


Thank you for reading.


Jam


*made up weight for the sake of the math problem

Friday, February 17, 2017

U.N.I.T.Y.


* this post brought to you by: U.N.I.T.Y. By Queen Latifah


     I used melt & pour soap for the first time ever this month and I'm not sure how to react to it. It was super easy to use, almost too easy and set up really fast. Weird way to start off this post, I know, but the challenge for this months Soap Challenge Club was to mix cold process soap with melt pour soap. Your thinking, 'what the hell is the difference, soap is soap.' Not so much, cold process soap is waaay more involved than melt & pour. According to the Soap Queen: 
 
COLD PROCESS: 
 Is the act of mixing fixed oils (common oils include Olive, Coconut and Palm) with an alkali (Sodium Hydroxide or Lye). The result is a chemical process called saponification, where the composition of the oils change with the help of the lye to create a bar of soap. One of the main benefits of cold process soapmaking is having complete control over ingredients. Depending on the ingredients you use, cold process soapmaking typically yields a long-lasting bar of soap. A downfall is that due to the chemical process, there are serious safety considerations to take into account and not all fragrance oils, essential oils, and colorants survive in cold process, thus limiting design options. Plus, patience is a virtue as this process involves a 4-6 week curing time.


MELT AND POUR: 
   Is the process of melting a preexisting soap base, most often adding color and fragrance or essential oil, then pouring the soap base into a mold. Once fully hardened, the result is a bar that is able to be used right away. Benefits of melt and pour soap include not having to handle lye, the wide variety of color and fragrance options available, kid friendly process, and no curing time. One downfall is that because of the additives in melt and pour to make it easily re-meltable and the lack of curing time, melt and pour soap does not last quite as long in the shower as cold process can. Because melt and pour soap is already made and the process is relatively easy, users are able to focus on the design of the soap. Most novelty soaps are made using MP techniques.


    Seems like I should've started with MP when I got into this whole thing, but as we've already established, I never take the easy way of doing things, instead I get frustrated, cry, throw a tantrum and then realize there was an easier way the whole time. But, I digress, back to this soap challenge. First, lets just say, that I didn't have a clue what I was doing, not only was I gonna be using an unknown medium, I didn't have a clue what the design was going to be. I was so used to working with a design and then just figuring out oils and colours that I was thrown for a loop this time around. My sister reminded me that February is Black History month and that maybe I should do something that pays homage to that. So, now I had an idea, but still no way to execute it, I didn't even have the MP soap yet! Typical. 

     I also didn't have time to wait for an order to come in, since I wasn't sure how long it was going to take and if I would have to possibly remake my batch if it went wrong. So, I committed absolute sacrilege and blasphemy, that's right, I went against the die hard soap maker's mantra on where to get quality products and went to (gasp) that craft store that starts with an M. I know, I know, but I was desperate, I also committed some other forms of soapy sins as well, in the form of chemical colourants  (meaning they were not plant, mineral or organically derived, which is my usual way) and my MP was not organic or 'natural' in any way, shape or form. Nope, it was just flooded with everything most people who started making their own soap tried to get away from in the first place, unfortunately there was limited choice available at my store.

     Ok, now that you're all done chastising me about poor soap choices let's get on with what I actually came up with in the end.


I bought a simple clear MP to start with and cut out 4-5 chunks (or cubes or sections whatever you want to call it) and set it into the microwave on 30sec bursts. It took about 3 times in the microwave for it to melt completely.


Once it was melted, I added my first colour, red in this case and got it to the shade I wanted.


 I then poured it into my brand spanking new mould (shout out to my mommy for this) and waited for it to harden. I read and saw on YouTube that it should normally take about 30-45min to harden, but as you can see in the pic that it was hardening before I was even done pouring. I'd say these were ready to take out in under 15min. Not that I was complaining, since I had A LOT of puzzle pieces to make.


 They weren't all perfect, but I got better as I made more, I even remembered to spray the tops with alcohol to prevent air bubbles by the 2nd batch. Then, I decided to add a different scent to each colour: 
  • Red - Grapefruit/Orange
  • Gold - Patchouli/Bergamont
  • Green - Mint/Lime
Did mention that I can't stand the scent of patchouli or mint, they mess with my sense of smell and tend to make me nauseous, but I did it and dealt with the headache afterward. 

     Now, it was time to move on to my CP part of the soap process. The part I was more comfortable with strangely (yes, I'm aware I'm weird). Some of you may remember, when I tried to make a perfectly balanced soap, with 50% saturated and 50% unsaturated fats in the bar. I went back to that recipe and tweaked it a little bit, mostly because I wanted to use cocoa butter, for a little bit of #blackgirlmagic in my soap. It was no longer going to be well balanced, but it would smell like chocolate, win! 

The new recipe consisted of :
Avocado Oil - 5%            Castor Oil - 5%
Cocoa Butter - 30%            Coconut Oil - 28%
Grapeseed Oil - 10%                  Olive Oil - 10%
High Oleic, Safflower Oil - 12%

 I also superfatted at 7% and did a water discount of 28%, I reasoned that this would make sure that it was a very moisturizing soap that would harden quickly. 

      Then it was time to start the saponification party. I mixed about 1½ tsp of activated charcoal with 2 tbsp of oil then added it to my lye and oil concoction (always wanted to use that word) and blended away.


     Once it reached about a medium trace I got ready to pour my design. First, I remembered to spray my MP puzzle pieces with alcohol, I used 91% rubbing alcohol, I read your supposed to use 99% rubbing alcohol, but you know I wasn't getting my hands on that in time. So I went with what I had, and it seemed to work well. Plus, I figured with the water discount I was ok with the tiny bit of extra water in the alcohol.


I poured about half of my CP soap into the bottom of the mould, connected and placed my puzzle pieces into it.


Then I covered them with the rest of my CP and then topped it with more interconnected puzzle pieces.


     I was a little disappointed with the way the black turned out to be more gray, but other than that, and the minty patchouli abomination (I mean scent) that is now wafting throughout my home, I'm very impressed with my growing skills.


      For those of you wondering why I chose these colours to represent Black History month, here is an explanation of the Black Power Flag colours. NO, I'm not a overly political person, but I am aware of the state of our nation right now, and believe that one day unity and open communication will prevail.
Image result for black power flag 


Thanks for reading 

Tuesday, January 31, 2017

Soaping with Chef Thuglife


     This month the Soap challenge club came up with something a little different. Instead of some sort of fancy design, exotic oil, or bright color, all we had to do was get someone else to soap with us. Sounds easy right, yeah not so much. See the thing is, most people think making soap is a really hard, tedious and time consuming endeavor, all things the general population tends to avoid. I had to have a plan, a good plan, the plan of all plans  in order to get someone to do this with me.
     So one night,  I walked into the kitchen and said to my family, "I need a volunteer for my soap challenge this month. You have to make soap with me." I got the blank stare and then the 'what the hell do you mean, make soap?' look. I explained the challenge and added that it wasn't going to be a fancy soap, just a soap. Finally my little sister took the bait, then I hit her with the fact that she actually had to choose what kind of soap she wanted. A few days later, she came back with a list of things that threw me...Rosemary, Lavender, and oatmeal. Now it was my turn to give her the blank stare, like what the hell was I supposed to do with these things? My brain finally started working again, and I asked her what exactly she wanted to soap to do?  Finally, she clarified that conditioning and bubbly was the main priority of this soap, it needed to smell like rosemary & lavender and had to have oatmeal in it. TO clarify, my sister has eczema, and while during the summer it's pretty easy to maintain, the cold drier months of autumn and winter tend to exacerbate the issue. She uses a Shea body butter that my middle sister makes for her, but wanted a soap that would also help her skin instead of drying it out and also have ingredients that she could read. Kinda like giving her skin a double whammy. Easy, right?
     So off to the interwebs I went in search of a recipe that would deliver all the things my sister wanted, and I actually found it! At lovinsoap.com, now I know that it is missing some things that she wanted, but I had the backbone that I needed to get started and weak along the way. So, continue reading if you want to find out how Chef Thuglife 🍍, made soap.
     I used the basic percentages and oils that Amanda laid out for the soap:

Avocado Oil - 15%          Castor Oil - 10%
             Coconut Oil - 30%     Olive Oil - 45%     

 This cocktail (can I call it that?), actually made an extremely cleansing (20 out of 22) & moisturizing (60 out of 69) bar of soap (some thing I've been striving for for months!) with a decent amount of bubble to it (29 out of 46), so a big thank you to Amanda.  I wanted it a little bit more creamy and conditioning and chose to go with the goat's milk but omit the honey, didn't want to deal with acceleration this go round. Well, as we all know, I never have everything I need when I need it and am always strapped for cash. So guess what I was out of...goat's milk. How the hell am I supposed to make extra creamy soap without the creaminess of that oh so special milk? Luckily, I had coconut milk, not a true milk but VERY creamy and high in fat, just what I needed. The final recipe was the above oils and percentages along with a 1:1 substitution of coconut milk for water and 1 Tbs. of whole oatmeal (she didn't want it ground up) and a ½oz total of rosemary and lavender essential oils.

                    *SN: We only made a 1lb batch of soap. Didn't want to overwhelm her.
1. Since my sister is a trained chef that is just started her own catering company (insert shameless plug) weighing out her oils was really fun to watch. She is worse than me about getting it absolutely exact.


2. I loaned her my gloves to weigh out the lye, but she wasn't phased.


3. She then had to post it all on the instagram.


4. We mixed the cooled milk and lye together and then the waiting began. I didn't want to risk soaping hot, just in-case the coconut milk had a high sugar count (I just wasn't sure). So we let it cool to about 100℉, we also learned that lye causes the milk to go to this soft solid stage that was really weird (and I, of course, didn't take a picture), but didn't seem to affect the soaping outcome.


5. Then it was time to mix (cue suspenseful music). She poured the oil into the lye and then used one of her favorite kitchen tools, the immersion blender, to emulsify her soap. Her analogy was to compare it to making mayonnaise (ugh, chefs).


6. We went to a medium trace. I wasn't trying to create a swirl or do anything fancy, so we didn't have to worry about it setting up on us. Once we hit the level of trace we wanted, the oats were added in and stirred everything at this point. While we didn't mind a little thickness, lumpy porridge was not the goal. We then added the rosemary and lavender essential oils to the party (forgot to take a picture, mostly because intense math was being done). My sister wanted more rosemary than lavender scent in her soap and we had to break up the oils into ⅔ and ⅓, to keep everything right.


 7. Time to pour! and pour she did...nothing was missed, she got every drop.


 8. Earlier I had picked a few springs from my rosemary and lavender bushes to maybe add a little decoration.

 9. Then we attempted a design on top. This is not something I normally do, but we tried. It looks like the leaves from the plants to me or arrows.


10. Smile for the camera! and put to set. She didn't want it to go through gel phase, so it was put in a cool place overnight.


We actually got along doing this, for that I'm grateful. Though I think she was waaay more excited about getting a custom made soap that would help with her eczema in the winter...until she has to pay for it.

And now the finished product of Rosemary & Lavender Oat Soap:


This soap came out very white without adding any Titanium Dioxide

Saturday, December 17, 2016

Eye Of The Tiger

   That title says it all, this is the 3rd soap I've made since I joined the soap challenge club, and I was determined and focused on the goal of getting my swirl technique as close to perfect as I could. This time when I attempted it, I wanted my soap to show that I was learning. So I kept it simple, ok sorta simple, minor tweaks only. You know I can't ever make things easy for myself.
     The challenge this time, was the tiger swirl technique. I really liked it, and it looked so simple from the demonstration, and as we all know simple is my new middle name! I didn't even want to stray too far away from the recommended slow moving recipe that Amy had suggested, that's how simple I wanted to keep it. Of course, that meant I just had to change something about it. Amy's recipe was listed as:

⠂33% beef tallow  ⠂33% olive oil  ⠂30% coconut oil
⠂4% castor oil ⠂6% super fat ⠂with a 30% lye concentration

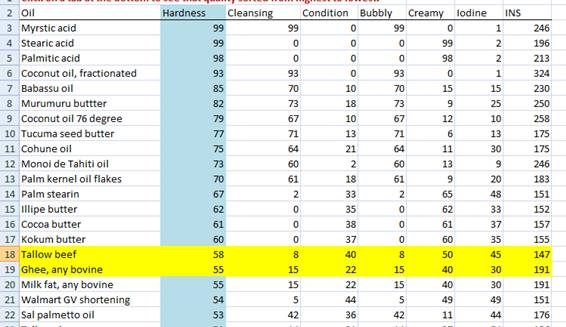
the down side...I don't have beef tallow or know where to get any at a reasonable price in my area. Now I had to find an alternative, that was very similar, available immediately and affordable. Nothing too hard at all, right? Luckily, a few months ago I had the bright idea to print out the oils list from Soapcalc.net (sometimes I'm a very intelligent woman, lol). While perusing the list I realised that Ghee was as close as I was going to get, and guess what?! I already had it in the house...


I actually use this to cook with, and if you haven't used it to pop your own popcorn, fry up an egg or make grilled cheese sandwiches, you're missing out, for real. If you don't know what Ghee is, it is...
''...a type of clarified butter that is not only used in the dishes, but also in medicines and traditional religious rituals in many parts of Southeast Asia.
"Ghee" comes from the Sanskrit word meaning "sprinkled," and it basically means that the milk fat is rendered from the butter to separate the milk solids and water. It’s made by melting butter and skimming the fat off of the top. You’ll be left with a yellow liquid when it’s hot and a creamy looking solid one when the ghee cools down. Not only is this easy to make, ghee also has a number of benefits.''  - Medical Daily


I make no claims about health benefits or anything medical, I just know it's a great tasting cooking fat that can tolerate relatively high heat. So I tweaked Amy's recipe by subbing out beef tallow with ghee, I didn't even change the percentages. Other than that I followed her recipe to the letter. To keep the batter fluid, I also added 1 tsp. of sugar per pound of soap, since I was only making 2lbs. of soap, I obviously added 2tsp. of sugar. Then I got worried that it would take too long to set up, because it was a slow moving batter and then I added a de-celerant to it. So I thought to myself, I'll add salt, but not the same amount as the sugar, because I thought that it would basically neutralize what I was trying to do.  I'm not sure if that's actually true, but I didn't want to test it out. So, only 1tsp. of salt was added to the batch.

     The colours were the same as well, with the holidays upon us, I had no extra funds to spend. So, I used what I had on hand Moroccan red clay, Activated charcoal, and Paprika. I knew from the cosmic swirl soap that a mixture of red clay and paprika would give me the orange colour I was looking for.  I decided to be very literal about this particular swirl So I mixed up my tbsp. of oil with 1 tsp. of colour and added it to my soap, of course it was not enough and I had to add to 'taste'. It ended up being more like 2.5 tsp of charcoal to get the right black, 3.5tsp. red clay and 2.5 tsp. paprika for the orange.


If you're checking out those colours you would guess that I went VERY literal for this swirl. I mean, tiger stripe swirl obviously means 'make it look like real tiger stripes'. That's the naturalist in me coming out, can't deviate from the correct colours that nature prescribed. Ok, I know that sounds weird, but I was trying to keep it simple and the idea of using super bright colours just didn't feel right to me, also I didn't have any super bright colours on hand to tempt me.

Image result for tiger stripes 

This was my inspiration, you don't even understand how happy I was to know that not only, did I have the right colours for this, but since Asia is where tigers are and I was using ghee and coconut oil, which are widely used there, it was serendipity (hey, this is my logic, just go with it). My mom and sister straight up called me a nerd because of this, I didn't care.

     Hopefully, you watched that youtube video linked above and saw how this was done, so I don't have to go into detail, but basically, you pour your soap out of a narrow spout container in as straight a line as possible and then alternate your colours directly on top of each other in straight lines. I started with black and white stripes to mimic the tiger's belly. As you can see, I pour a straight line like sailor walks on land.


then I did the transition to orange, and quickly realized that this was going to take forever.


So, I created my own quick pouring method known as the 'double fisting'. It's just what it seems have a container of colour in each hand and pour back and forth. I tried to get my sister to take a video of me doing it, but she refused (ugh, siblings!). I thought about doing another swirl pattern on top like I saw in all the videos, but after looking at mine, I decided against it. I mean, how much more "tiger-like" can it get. I'm positive this is a once in a lifetime result, wasn't gonna ruin it.


     I had a good amount of batter left over after pouring this one and thought, "self, why not "be creative" and try another pouring technique to see if you can get the lines to be super straight." That's when the bright idea of putting cardboard on top hit me. I know I saw another soap blogger do it, I think for wood grain technique and I wanted to try it (see...determined to try new things and get better).


It started to get thick towards the end and a bit gloopy, hence the  lumpy look at the top. I didn't do CPOP this time (I regret that) and forgot to wrap it to get it to go through gel phase. I was so used to soaping in the summer and having my soap automatically gel (because my A/C is broken and my house is hot) that I forgot that my mother keeps her house in the mid-high 60's this time of year. So when I left out overnight, I don't know what I was thinking.
     It was ready to un-mould the next day, but I wanted to be sure it had set right, since it was a slow moving batch, so I took it out on the mould but left it alone for another 48 hours. Then the big day came, it was time to cut! I was soo excited, my family thought I was off my rocker (lol, I always wanted to say that.)

     The first one, done the way Kenna of Modern Soapmaking and Amy showed, looks very much like my inspiration photo.


 the next one, that I did some experimenting with, looked like what I thought it should look like, with the white right under the orange. My stripes for both are amazing, at least to me.

My nephew thought it would be cool
to stick his finger in the soft soap.
     While, I didn't add any fragrance (I'm still not sure about adding smell goods, because I'm never sure how people will like it, and then might get stuck with stinky soap), it still had a unique scent. I thought the ghee scent was very prevalent, non one else noticed that, but they did say that it smelled good. It was also a but crumbly on the edges, I personally think that was due to not gelling it. If I use this recipe again (almost positive I will), I'll definitely gel it, come to think of it, these colours are really bright for not going through gel


Facebook